Image Map

Literacy Centers and Organization

Hi Everyone!

I am Meghan from Meghan's Pad.  I wanted to give you all a sneak peek at what I am doing during my literacy center/guided reading time this year, and how I have it all organized.

This week {tomorrow} I will have a new class of Kinders that will begin their year with me.  Each year, I feel the need to revamp an area of my curriculum.  This year, it's my center time!  


Centers are a great way, as we all know, to engage students in learning by providing them with hands on learning materials and the opportunity to regulate their learning needs.

This year, I am jumping back on the center wagon, and I couldn't be more excited!  The past few years I have struggled with having to use the district mandated curriculum, knowing that Kinders need more hands on, play based learning.  I have struggled with the early finishers, the no matter what I give you to do, you are going to refuse to do it, and the different learning styles and needs.

After much reflection, I have come up with a format that I think I am going to like, and a format that I hope my kinders will like as well.  Here it goes...


Each day I will gather the children on the rug for a small mini-lesson.  These mini-lessons are going to be based on the needs of Kinders.  These lessons can include alphabet, sounds, building words, rhyming, segmenting, strategies, digraphs, consonant blends, vowel blends, and the list goes on.  I will then have a "have to" activity that the children will need to do each day.  During the literacy block it can be an alphabet center, letter writing center, building word center, reading center, phonemic center.  Each day their have to center will switch, so by the end of the week each child has completed all the have tos.  

After the "have to" center is complete they will either turn it in, or will fill out a small exit slip, so I can quickly review their understanding, along with hold them accountable for doing the center.  Then the children will choose a "can do" center.  These centers will be a combination of old "have tos" and other centers that help to support that centers "have to."

Have I lost you??  I know it's confusing!  Here is an example:  A student on Monday will go to the alphabet center and complete the "have to" center.  Once they are done, they fill out and turn in their exit slip.  They then go to the alphabet "can do" drawer and grab a center, take it back to their seat {not assigned, just where they were working} and complete that center.  Once they have completed all the "can dos" that they want, then they can go to the alphabet "now what" drawer to work on those activities.

The "now whats" are going to be more independent activities that can include "worksheets," or reading.

My hope is that children will continue to be engaged, and will find the learning method that they prefer.


So now, the storage!  I love to organize, and love to buy bins.go inside of bins.  So these are PERFECT!  
         

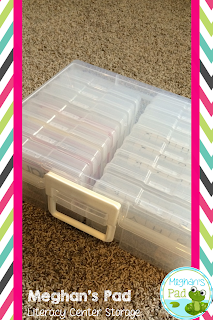
I love to find bins that I found these bins at Joann Fabrics, and have been in love with them.  Each center fits perfectly inside these 4X6 photo cases {materials and all}!  


I am currently putting each center into a small container, and then each container into a drawer system.  This picture was taken before I labeled the drawers.  I have the "can do" centers in one of the drawers and the "now whats" in the drawer directly under.  Each is labeled with the center {alphabet, letter writing, word building, etc.}, and a number {either 2 or 3 for "can do" and "now what"}.


I am currently working on setting up something similar for math and our phonics time.

I would love to know how you do centers in your room?  What do the children do when you are in a small group?  I can't wait to hear all the great ideas!!


Feature Friday - The Learning Studio Bug

Hi Everyone! It's Annie from The Learning Studio Bug! I'm very excited to share with you on this Feature Friday!

I want to share with you a few of the tools I use to reinforce my behavior management system in my classroom.

I have a whole "bear" theme which my kiddos LOVE! I also love the ease of using a clipchart! The children's names can be moved "up" the chart quickly and it creates a great visual to reinforce those good habits and behaviors which we love to see! 

It's so important to ensure that these little kiddos are given every opportunity to receive positive reinforcement when they perform their responsibilities well, follow instructions, being good listeners, stay on task and most importantly when they follow the class rules. I disagree with having behavior charts that can potentially demoralize a child's self esteem and shut down their initiative to perform their very best.  So rather than "dinging" them for poor behavior choices, I committed to reinforcing GOOD behavior choices in my behavior management system. This is what I came up with, created and have used with great success in my classroom.


This system is pretty simple and this is how it works:

During the first week of school when rules and expectations are modeled, I introduce my "How Is Our 'Bear'`Havior?" Clipchart to the class.


Each day they earn the opportunity to move their "Bear" Clip up to the next color on the chart based on their behavior (for example when they make good choices, perform their responsibilities well, follow instructions, being good listeners, stay on task and most importantly when they follow the class rules).


The beginning color on the chart is green. They are called "Climbing Bears". Every student is a "Climbing Bear" and strives to continue "up" the chart as they progress. When they reach the top of the chart, they've earned "The Golden Bear" award for that week. 


At the end of each day, I give each student a token whose clip was moved up. They can earn up to four tokens each week. With their four tokens they can exchange them into "Bear" Bucks. (I couldn't resist throwing in a little monetary exchange to reinforce their money math skills :) If a student hasn't earned a token, their "Bear" Clip remains on that color and can continue to strive to move upwards the next day. At the beginning of each week all the "Bear" Clips begin again at the color green. 


They can then use their "Bear" Bucks to purchase reward coupons or opt to delve into the class treasure chest where specific reward items or coupons are worth from one "Bear" Buck on up. Trading opportunities are provided at the end of each month. They are always SUPER excited to save those "Bear" Bucks and trade them in for such tangible rewards that they themselves have worked hard to earn. It's wonderful to see the look of pride in their expressions when they earn each token or "Bear" Buck and receive their reward coupons or treasure!


*For any cuties whose "Bear" Clip remains on the first green color, I send home a short note to their parents encouraging them to discuss the importance of making good choices at school and to remind them to keep trying. I believe in all they can achieve and remind them that they "Can Do It!"


As with any behavior management system implemented in your classroom, it must be clear to your students and consistent in order for it to be most effective. Classroom management is especially important at the beginning of the school year. It sets the precedent for the rest of the year and the tempo of attitude in your classroom. I've found my "Bear"~Havior system to be very engaging, good habit forming and most of all positively reinforcing for my little cutie~pies' behavior. They feel safe in our classroom environment and know exactly what is expected of them in our daily routine.


      Thank you so much for making me a part of our Kinder Tribe's Feature Friday!!!

My "Bear"~Havior System is available to download and use for your classroom at:


What Worked Well Wednesday: Math Journals

Hello Friends!  It's Heather from Learning with Mrs. Langley and I'm excited to bring you What Worked Well Wednesday
It's that time of year when we are implementing all those procedures in the classroom.  Math Journals are something that we have been trying to encourage in our district for a couple of years now and if you've never used them they can be difficult to start.  I hope I can inspire you to give them a try today!

First: Where to start? 

I use regular composition books for our math journals.  If you get them during back to school sales they are good and CHEAP!  They last all year and can stand up to a Kindergartener.
I have a half day schedule so I have 2 sets of math journals.  I keep them in separate bins so I can keep them straight!
Once we have our books labeled with names I go over our expectations.  Just like everything else in Kindergarten you have to tell them EXACTLY what to do.....step by step.
  • Open up to the next new clean page each day.
  • Write your name at the top of the page (this is not necessary, but I like the extra name writing practice).
  • ONLY write on the page for the day (no flipping through the book)
  • Draw a picture to solve the problem and write the answer at the bottom of the page. 
This is where we start.  Our routine builds throughout the year but this is what it looks like through August and September.

Next:  What do we put in them? 

We use our journals to SOLVE PROBLEMS but at the beginning of the year we need to learn how to record our thinking and write our numbers.  My very first lesson starts with counting items and recording them.  We actually do this for a few weeks to get into the routine.

Once we have our routine in place and we are really good at counting items, recording them, and writing our numbers we start addition problems.

I write all of my own problems for Kindergarten.  We start with addition problems and explore unknowns in all positions.  
To make it EASY PEASY to put the problem in their journal I have 2 solutions for you. 

#1 You can write the problems as a label and print out a page of labels for every problem.  (I did this for years, it works great!)
#2 Write the problems out on a grid, print them out, cut them, and have kiddos glue them into their journals. (This is how I do it now, it takes a little training!)

Here is an example of the grid.
Why go through all the trouble?  It is SUPER important to write your own problems!  Really it is!  Use your kiddos names, use their interests, talk about your class....whatever! If they are PART OF THE PROBLEM then they are EXCITED to be part of the SOLUTION! Engagement goes up 10 fold when you write problems to match your kids.

THAT'S WHAT WORKS FOR ME!  Do you use math journals in your classroom?  What works for you?  If you haven't ever tried journals I encourage you to give them a try this year.  August/September is a great time to start!

Now it's your turn to link up.  We would love to hear what works for you in your classroom.  Link up here to share!  Be sure to visit a couple of the teachers that linked up to share a little Kinder Tribe love!


Go Tell That Grinch!

Happy Monday, Kinder Tribe!
This is Deirdre from Mrs. Garcia’s Super Scholars sharing a quick management tip with you. I’m keeping this one quick since I think we are all a bit exhausted with this whole back to school thing! 

We've all had that little friend who is kind of...well, mean. They might be the one kid who is always throwing off the classroom environment with nasty remarks, or they may be completely well-meaning with absolutely NO filter! We all know them! 

I have a little trick that lets them express themselves and not hurt their classmates' feelings. Enter The Grinch! 


Many moons ago, I worked at Kohls. I won't go into that experience here, but I would always pick up the $5 Kohls Cares for Kids stuffed toys and books in anticipation for my future classroom. A Grinch plush was one of them. He usually makes an appearance in December with our Elf, and stays out for the rest of the year.

One day after several tattles, rather than crying and losing my sanity reminding my friend for the umpteenth time to use our Bugs & Wishes Wheel, I randomly blurted out, "Go tell that Grinch!" 

What started as a sort of "tattle monster" turned in to something else. If we were frustrated about something or someone, we could tell the Grinch. If we reeeeeally didn't like the barrettes our friend was wearing (it's happened!), we could tell the Grinch. The Grinch likes to know mean things!

In a perfect world, our kids would be nice to each other 100% of the time. But in the meantime, I have the Grinch. This little green guy has made a huge difference in our classroom- the number of hurt feelings has gone down, and my students are able to get those oh so important kindergarten thoughts off their chests without getting in trouble or hurting a friend. "Go Tell That Grinch!" has become a staple in our classroom. If someone is about to be mean, they are redirected straight to the Grinch. If you want to bring the Grinch to your class, you can find a similar one {here}. 

Thanks for reading! Hope your back to school is going splendidly!

What Worked Well Wednesday - Meet the Teacher!

Hey y'all!! Emily here, from Carnes' Corner.  I know MANY people are just now preparing for the beginning of the school year, but today is already day 9 for me!  This school year has truly gotten off to a great start, and I am excited to share some Meet the Teacher tips that I feel really helped get the year started on the right foot!

********

Meet the Teacher is such an excited time for me, but it's also super stressful!  All those parents in my room at the same time? They all want to talk to me? How do I get all of that info to them at the same time?  What about those kiddos who are running around playing in my classroom?  Here's what I found works really well to accommodate all of those parents, but still make the day (or night) all about the kiddos:

*Use a scavenger hunt
This way, parents and students are kept busy, get a feel for the classroom, and there's a bit of structure. :)  (I even set it on a small desk right outside the door, so that they had something to do immediately and wouldn't have to awkwardly stand and wait for me if I'm busy talking).


{I made a quick scavenger hunt which sent them to the supplies sorting station, to the classroom bathroom, to find the book bag hooks, to the calendar, the library, to find their seat for paperwork, and finally to me!}

*Put them to work!
Most families were urged to bring supplies during Meet the Teacher, so I set up a sorting station and put the parents to work!


*Have an info packet for parents to take home
This way, you can have them read through the packet FIRST, before bombarding you with questions!


*Give cheesy presents!
I gave the students "Ready Confetti" and the parents got some popcorn!


{I can't remember where I got the popcorn tags...ahhh!}

(I know it's the beginning of the year, but a tidbit to help you for NEXT year...save all of your Meet the Teacher templates, and edit them/make your copies at the end of this year.  That way, you already have those copies made and won't need to fight people for the copy machine at the beginning of the year next year!)

What do you do to make Meet the Teacher flow smoothly?? Have you started school already? What activities have you done that you and the kiddos LOVE?!  Link up below, and let me know!

******

Please be a friendly blogger and go "meet" at least two new bloggers who've linked up.  This is such a great way for us to get to know each other and encourage each other!

Teaching Back to School Procedures and a FREEBIE!

Hi Everyone!

   It's Cori from Mrs. B's Beehive!  Today I wanted to talk to you about teaching procedures at the beginning of the school year.


We all know how important it is to set the tone, and clearly communicate our expectations at the beginning of the year.  At the end of the year, your class will be running like a well oiled machine.

By May, I've got all my little teacher helpers organizing things for me just the way that I like them.  I often forget, (probably on purpose) just how much time it takes to get them to that point!  There are so many little pieces of information that I need my students to understand to make sure that the day is focused on learning, and that I am not spending my time running around behind them cleaning and correcting.

I wanted to share with you what my first week's schedule looks like:


Like most other teachers, I read a lot of back to school books. I do a lot of activities around those books and start my preliminary assessments.  In between all of those activities, is the teaching of procedure after procedure.  In the first week I try to prioritize my most important procedures, and go over the ones that will be most effective in establishing a smooth running classroom. (Don't touch the fire alarm!).  Even a simple task such as entering the classroom in the morning, has many different components.


To help myself remember everything that I need to teach them, I made this procedure checklist.  I keep it right next to my first week (and second and third week) lesson plans.  As I teach a procedure, I check it off the list.


There are many times that I find an extra minute here or there in the first couple of weeks, and I quickly scan over my procedures list, and see if there is any information that I can squeeze in to a lesson, to make sure that the students fully understand my expectations.

If you would like a free copy of this Back to School Procedures Checklist, click HERE, or on any of the pictures above.

This list has worked well for me over the last couple of years, and I hope it is something that you will find useful as well as you gear up for back to school!

Feature Friday: Danielle from Carolina Teacher

Happy Friday, Kinder Tribe! It's time for another Feature Friday! Every Friday we will feature a member of the Kinder Tribe who will be sharing their expertise with us!


This week's awesomeness comes from Danielle from Carolina Teacher! She has some really excellent tips for reaching your ELL students! Take it away, Danielle!


Hey Kinder Tribe!  I'm Danielle from Carolina Teacher, and I am so excited to be a guest blogger today for Feature Friday.

Like many of you, I'm sure, I have a large population of Spanish speaking students in my classroom.  Last year, I was a part of an amazing professional development on working with Latino English Language Learners.

So I wanted to share a few strategies with you for how I work with the ELLs in my classroom.  (I will talk mainly about Spanish since that is what I have the most experience with, but many of these strategies work for ELLs with other backgrounds as well.)

Did you know that ELLs will understand English better if they continue to develop their home language, too?  Unfortunately, when children enter school, they often feel like their home language is less valued and they don't like to speak it.  I've heard stories from parents of older children whose kids won't even speak in Spanish to them at home.

A few ways you can honor their home language:

  • Allow them to speak their home language when they are speaking to their friends.  If possible, I like to sit at least two Spanish speakers together, so they have the opportunity to speak Spanish whenever they want or need to.
  • Learn about holidays, foods, and traditions from their culture.  Ask the children and families to share about their experiences.
  • Read books with Spanish words.  Allow your Spanish-speakers to be the experts, and teach new words to the class, as you read.
There are tons of books that include Spanish words.  Here are a few of my favorites...
Dear Primo has two cousins writing back and forth to one another.  One lives in the US in a city, and the other lives in rural Mexico.  It's great for teaching letter writing, compare and contrast, or just a fun read aloud.

Manana Iguana is a twist on the Little Red Hen story.  It's great for a fractured fairy tales unit!

Martina the Beautiful Cockroach is a super sweet folktale from Cuba.  It would also be great to include when teaching fairytales and folktales.  It is also one of my favorite read alouds.  I love the pictures!


This one is a little bit trickier, and can be dependent on the resources at your school.  I know a little Spanish, but not enough to feel confident in speaking with families.  However, there are lots of creative ways you can keep families informed and communication open.

Last year, I started using Google Translate for everything I sent home.  Although nothing is perfect, I checked with a few Spanish-speaking colleagues and they said this was a fairly good translation program.  Every time I wrote a newsletter, permission slip, or invitation, I copied the text and put it through Google Translate.  I always included a disclaimer at the top that said something like: "This was translated by a computer program.  I apologize for any errors."  Then, I copied everything with English on one side and Spanish on the other.  I was amazed at how this small action made a huge impact on family engagement.

I also try to have a Spanish-English interpreter available at class events.  Like I said, this can be difficult if your school does not offer an interpreter, but I wanted to share one strategy I used last year.  I contacted the ESL teacher at the local high school and asked if any Spanish speakers would be willing to volunteer as interpreter at our Open House and Curriculum nights.  This of course would not work for any conversations where you're talking about confidential topics, but can be super helpful at the class or school wide events.

The Frayer Model is a great way to develop vocabulary and language.  It is a graphic organizer that includes a child-friendly definition, a picture, examples and non-examples.

You introduce the word and develop each part of the graphic organizer together as a class.  There are lots of ways to adapt it to make it work best for your class.  Here's one we did last fall.  To help students get started on the concept of examples and non-examples, I had several pictures for them to sort.
You can also have students draw a picture, and then generate examples using their picture.  For Winter, we also did a Frayer model.  For that one, the kids drew and wrote a page to show an example and a separate page for non-example.  I'm so sad I can't find the pictures I took of their finished products!  It was a great way to tell who understood...they drew snow, ice, etc. for the example picture and summer, spring and fall pictures for the non-example.  Then, we made lists for the graphic organizer based on the picture.

I hope this gave you some new ideas for working with the English Language Learners in your classroom!  Thanks for reading.