Image Map

Kinder Tribe Book Study: The Next Step Forward in Guided Reading Chapter 2


Hello, Kinder Tribe Friends! This is Kelly from My Fabulous Class. I am so excited about this book study. I own the previous version of this book, but decided to purchase the updated version and I have here to tell you, it is worth it!!! I think the layout is easier to follow, there is new information, and I LOVE the spiral bound pages. If you haven't gotten the book, I highly recommend it.You can find it on Amazon HERE.


Today, I am talking about Chapter 2, The Pre A Reader. How many of your kids are in this category in the fall? When are they expected to be out of this stage? I would say, 50-75% of our Kinders fall into this category in August. It seems to vary year to year. The expectation at our school is to be out of this phase by October.


I know from talking to many of you, Pre-Guided Reading lessons can be a challenge, Jan Richardson does a great job of laying out exactly what you should be teaching and for how many minutes.


 I think we all start are year off with having students work with their names. Jan says to spend 1-2 minutes working with their names. She suggest using name puzzles, magnetic letters or rainbow writing.  I like to make these simple name puzzles and have all of students work with building their names. I have created this FREE Editable Name Puzzle. You can download it here.You can get the Editable Caterpillar HERE. It comes in color and black and white. I recommend printing it in color without any letters. Then, you can reuse them year after year. You can cut the circles with a 1.5 inch circle.

In the book, Jan provides several examples for working with letters. She suggest picking one activity and working on it for 2-3 minutes to help build automaticity.

I have always been a fan of matching letters to an alphabet chart. I have been known to do this everyday with my lowest kids. You can find this alphabet chart HERE. Jan provides several activities specific to the alphabet chart. I like asking students to find the letter that you here at the beginning of ______ (insert word from alphabet chart).

I really like the idea of asking students to lay out the letters in their bag and simply naming them. Fast and easy, yet so beneficial.


Jan recommends doing 1 sound activity a day to teach phonological awareness.


Clapping syllables is great for building phonological awareness. At first, you will clap with students, but the goal is for them to do it on their own. You can find this syllable activity here.


Hearing rhymes is also important. In the beginning, you will say two words, such as pig and wig. Students will repeat the words then give you a thumbs up if they rhyme.


 Segmenting words into onset and rime will help students to distinguish the ending sounds. You can find these activities here.


Sorting pictures is another way to work on sounds. I start with picture cards and put the letter cards away. In the beginning, I will just layout 3 picture cards, two with the same sound and one that is different. I slowly name the pictures, then ask student which two start the same. 


Once you are ready to introduce letters, Jan suggests starting with two consonants. Pick ones that are meaningful to the students in your group, such as the letter in their first name. You can find both of these activities here.


 Jan talks about doing a picture walk with a book. I know some teachers skip this, but it is CRUCIAL (in my opinion). First, your supporting students vocabulary. Second,you are helping build confidence by previewing the story. After you preview the book, Jan says to do shared reading of the book. Essentially, you corral read with your students. Finally, you work on concepts about print. I like to have students find a letter in their name and find a sight word we have worked on. Other concepts include first and last word, one and two letters, punctuation, and upper/lower case letters


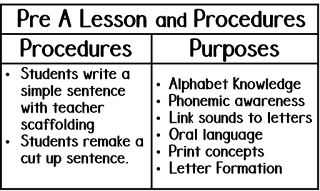
For your Pre-A students, you will focus on share the pen. I like to dictate a sentence related to the book we are reading. Students draw a line for each word (was this in the old book? I have not been doing this!) Use the alphabet chart to help write letters that they here or know. Select one or two letters for letter formation. Cut up the sentence and have students rebuild it.


I created this Pre-A Guided Reading unit. It includes the activities I featured in this post, plus many, many more. I will be adding black and white pages by the end of the week to meet your printing needs. You can buy now, and get the updated version FREE. This unit will remain on sale for 50% off for the remainder of the book study. Enjoy!

Image may contain: text

Before I go, I want to remind you to enter our Kinder Tribe Giveaway. You could win a gift card to TPT valued at $100!!! Enjoy!!!


a Rafflecopter giveaway

Guided Reading Favorites

As we are final our final trimester, I'm working hard to ensure that my Kinders are reading at grade level. Where are your Kinders supposed to be reading at the end of the year? We say a text level 4 is grade level, but we would really like them at a 6.

I see each group for approximately 20 minutes, although I wish it was 30 minutes! I broke down my Guided Reading Group for you with this little visual.


 Of course, this can vary. My lower kids usually need additional Word Work time. Sometimes, I forgo the writing and just do reading. It depends on the group, the lesson, the day. Keep in mind, I have a whole group phonics lesson everyday, as well as word work centers. This is just additional practice in small group, usually tied to the book/ For writing, I also teach that whole group. This is just extra practice, usually focusing on foundational skills. 

It is important to PLAN your lesson. I do lesson plans for each group, using this sheet. You get this sheet FREE in my TPT Store.


This sheet allows me to plan my lesson in advance, as well as take notes during the lesson. You can highlight what strategy they are using and put notes about what they are doing well or future teaching points. Best part, it is editable. You can type in your lesson plans and print. I personally prefer to hand write them in, but I do like to type student names.


In addition to planning, I think it is important to take running records. I LOVE this free form I found from Leveled Literacy Intervention. You can find this, and many, many more FREE goodies HERE.


For my struggling kids, I enjoy using these Beginning Sound Activities for Word Work. There are 10 different activities you can use. For kids who are really struggling, try just focusing on phonemic awareness, no letters. For example, show them pictures for a, b, and c, and ask which one starts with /b/ (make the sound). For some kids, it helps to just focus on the phonemic awareness.


For my on grade level and high kids, we are working on CVC Words, I like to introduce all of these activities during small group, then move them to a Word Work Center. This bundle will last you the rest of the year. You can grab it here

After Word Work, we read a familiar read. This is when I do a Running Record on one student. For my new book, I always give a detailed into, that includes 2 "tricky" words. The "tricky" words may be sight words or it may be vocabulary I don't think they know. 

I am lucky that I have access to Guided Reading books at school. If you do not, check out Tara West on Teacher Pay Teachers. She has bundles of just Guided Reading Books or bundles for the year. I have this set and I really like it.

Finally, for writing, I often have kids write 1-2 sentences that are related to the story. We often take 2 days to do this since I only spend 5 minutes on writing. If we are short on time, we might just write a few sight words or discuss writing foundational skills, such as capitals, spacing, and periods. 

I hope you all have learned a few helpful hints for Guided Reading. If you are looking for more, here are two of my favorite resources.


Fall Math Freebie

This post contains affiliate links. I receive a small compensation if you purchase the below materials from the affiliate link.

Hello Kinder Friends. I hope you all are starting to enjoy some cooler weather! I have finally gotten to break out my sweaters, but it's still a little to warm for my tall boots and scarves.

Today, I'm here to share with you one of my favorite my games - Roll and Cover.
For this classic game, students roll the dice, count the dots, and cover it. Super simple and kids love to play it over and over again.

You can make it a partner game and have students race to see who can cover their board.


At this time of year, we are working with the numbers 1-10. I didn't want to do two dice and go to twelve, so I made a spinner to go to 10.  I LOVE how the kids are getting extra practice with the ten frames on this game. You can get all the game boards and the spinner FREE HERE.

{When you download it, yours will say spin and cover not roll and cover}

I bought these spinners off of amazon a few years ago. I found that when I stuck them straight into the spinner, they didn't spin very. So instead of directly attaching them to the spinner, I cut a square of leftover laminate, hole punched the middle, and added the spinner.


Then, you just lay the laminate on top of the spinner. It works for ANY SPINNER! 
LOVE IT!!!


You click above to buy 8 spinners to make your own spinners.

Are you looking for more Fall Math Games?
Check out my Fall Math Centers
(Yes, I used the same spinner for the 1 more/1 less game!)

I often get asked where I found my plastic pumpkins. I got them at Target a few years ago. I did find that they do have similar ones on Amazon, but as cute as they are, they are 7.99 for only 25!

Fine Motor in Kindergarten

Hi everyone! It's Kelly from My Fabulous Class. I imagine many of you are settling back into school...and I know a few of you are STILL enjoying summer! We are on our third week. At the beginning of the year, I like to assess students on some basic fine motor skills. Can they do the basic skills of writing, gluing, and cutting? What about picking up small items? I have two FREE activities to help you assess these fine motor skills.


First up, cutting. These are HARD lines for kids to cut. I like to talk about taking "small bites" with the scissors. I model big bites, which is opening the scissors all of the way, and small bites, which is only opening them a little. After students cut it all up, I have them glue it on construction paper to have a display, but you could just as easily have students recycle the strips.


I LOVE these little glue dot apples. It's hard to see from the picture, but there are actually 3 sizes of sequins! Squeezing a dot of glue onto a dot is a pretty challenging fine motor skill. We talk about the different using the "right amount" of pressure when you squeeze. I model too little pressure and too much pressure before I have students practice. Then, you add in the fine motor skill of picking up tiny sequins, and wow, you'll be able to quickly assess a student's fine motor skills.

You can get both of these activities FREE HERE.

Now, you may be wondering, what do I do if my student has poor fine motor skills? Check out these posts.

This post is full of FREE ideas with play dough, dabbers, tweezers, and more. 


This is another great post with clothespins and pipe cleaners. I hope this helps you all!


Scrapbook Paper in the Classroom


Am I the only one with a scrapbooking paper OBSESSION?!? Yesterday, I made my weekly trip to Michael's. Yes, I go weekly in the summer. I never want to miss anything. Now that their Camp Creativity classes have started, I will be there multiple times a week! My girls LOVE to get their crafty on, like their mama.I was pretty excited when I saw their open stock scrapbook paper was ON SALE. Don't forget, they offer an additional 15% off for teachers..


I remember seeing a post awhile back from my friend Jennifer at Crayons and Cuties in Kindergarten about making games on scrapbook paper so I decided to give it a try. I made this simple upper and lower case letter matching game. You can get it FREE HERE. You will need 9 pieces of scrapbook paper for this one. I would not recommend giving the kids all of the pieces at once. That would be a BIG memory game.


I also made a simple number and ten frame game. I liked it so much, I printed it on different themed paper for the entire year.  The scrapbook paper stops the paper from being see through, so kids can't cheat. Be sure to laminate them for durability. You can get this game FREE HERE. You can use these cards all year to differentiate math skills. Check out the different memory games I play with these cards on my blog HERE


One quick tip- make sure when trim the paper to fit in your printer, you trim off the side with the price printed.


 I wanted to try making die-cut letters out of scrapbook paper. Honestly, it is much easier to cut these with my Cricut Expression, but in a crunch, you can hand cut them. I highly recommend these Fiscar scissors. I typed the letters with KG The Last Time Bubble. You can get it free for personal use HERE

Until next time,

What Worked Well Wednesday Linky- Staying Organized This Summer

Hello, teacher friends. It's Kelly from My Fabulous Class. I hope you all are enjoying your summer or will be very soon. Today, I am talking about staying organized with your materials in the summer. Actually, this home organizational system can really help you store your teaching printables all year long.

I am  a pinning addict. Seriously. It's out of control. The problem is, I pin amazing winter ideas in May then forget about them by January. I also like to add products to my TPT Wishlist and then I forget about them.


I like the idea of printing things when I find them, but if I print a winter theme activity in June, I end up with piles like this all over my house. It drives my husband crazy. Plus, the papers can get ruined if I don't laminate right away. In the summer, this becomes a HUGE problem because I do print like crazy, but I can't take it into my classroom right away.


I decided to solve this problem with a file carrying case, hanging file folders, and ziplock bags. I bought all of this at Wal-mart but I am sure Amazon has better deals. I labeled the file folders for the months Aug-May, sight words, word work, and math. I have some additional folders that I can add labels to, as needed.


I found this cute beginning sounds center FREE on TPT. I laminated it, cut it, and bagged it. It is ready to go in August. If my August folder gets to full, I might move this to my beginning sounds folder.


I found these FREE Ten Frames for Counting the Days in School LAST YEAR. I was just going through my Back to School Board and found them. They are now printed an in my August folder.


I found this amazing activity HERE on Pinterest. I haven't had time to laminate it, so I just placed it in the January folder. If you are wondering how I can afford to print so much color, I have two words for you - HP Instaink. BEST INVESTMENT EVER.


When you close it up, you have a simple carrying case that you take to school when you need to. It does not take up much space at home and keeps you organized.

What has worked well for you lately? Be sure to link up below. Looking for great ideas that have worked well for other teachers? Read these great posts.