Image Map

What Worked Well Wednesday Linky- Staying Organized This Summer

Hello, teacher friends. It's Kelly from My Fabulous Class. I hope you all are enjoying your summer or will be very soon. Today, I am talking about staying organized with your materials in the summer. Actually, this home organizational system can really help you store your teaching printables all year long.

I am  a pinning addict. Seriously. It's out of control. The problem is, I pin amazing winter ideas in May then forget about them by January. I also like to add products to my TPT Wishlist and then I forget about them.


I like the idea of printing things when I find them, but if I print a winter theme activity in June, I end up with piles like this all over my house. It drives my husband crazy. Plus, the papers can get ruined if I don't laminate right away. In the summer, this becomes a HUGE problem because I do print like crazy, but I can't take it into my classroom right away.


I decided to solve this problem with a file carrying case, hanging file folders, and ziplock bags. I bought all of this at Wal-mart but I am sure Amazon has better deals. I labeled the file folders for the months Aug-May, sight words, word work, and math. I have some additional folders that I can add labels to, as needed.


I found this cute beginning sounds center FREE on TPT. I laminated it, cut it, and bagged it. It is ready to go in August. If my August folder gets to full, I might move this to my beginning sounds folder.


I found these FREE Ten Frames for Counting the Days in School LAST YEAR. I was just going through my Back to School Board and found them. They are now printed an in my August folder.


I found this amazing activity HERE on Pinterest. I haven't had time to laminate it, so I just placed it in the January folder. If you are wondering how I can afford to print so much color, I have two words for you - HP Instaink. BEST INVESTMENT EVER.


When you close it up, you have a simple carrying case that you take to school when you need to. It does not take up much space at home and keeps you organized.

What has worked well for you lately? Be sure to link up below. Looking for great ideas that have worked well for other teachers? Read these great posts.

What Worked Well Wednesday Linky: A-Z Countdown to Summer

Hey, y'all! It's Breanna from A Pinch of Primary!


I am so excited to be popping in to the #KinderTribe blog again for the #WWWW linky.

I don't know about you guys, but we are full-swing into end-of-year madness. We have 13 days. THIRTEEN. DAYS.

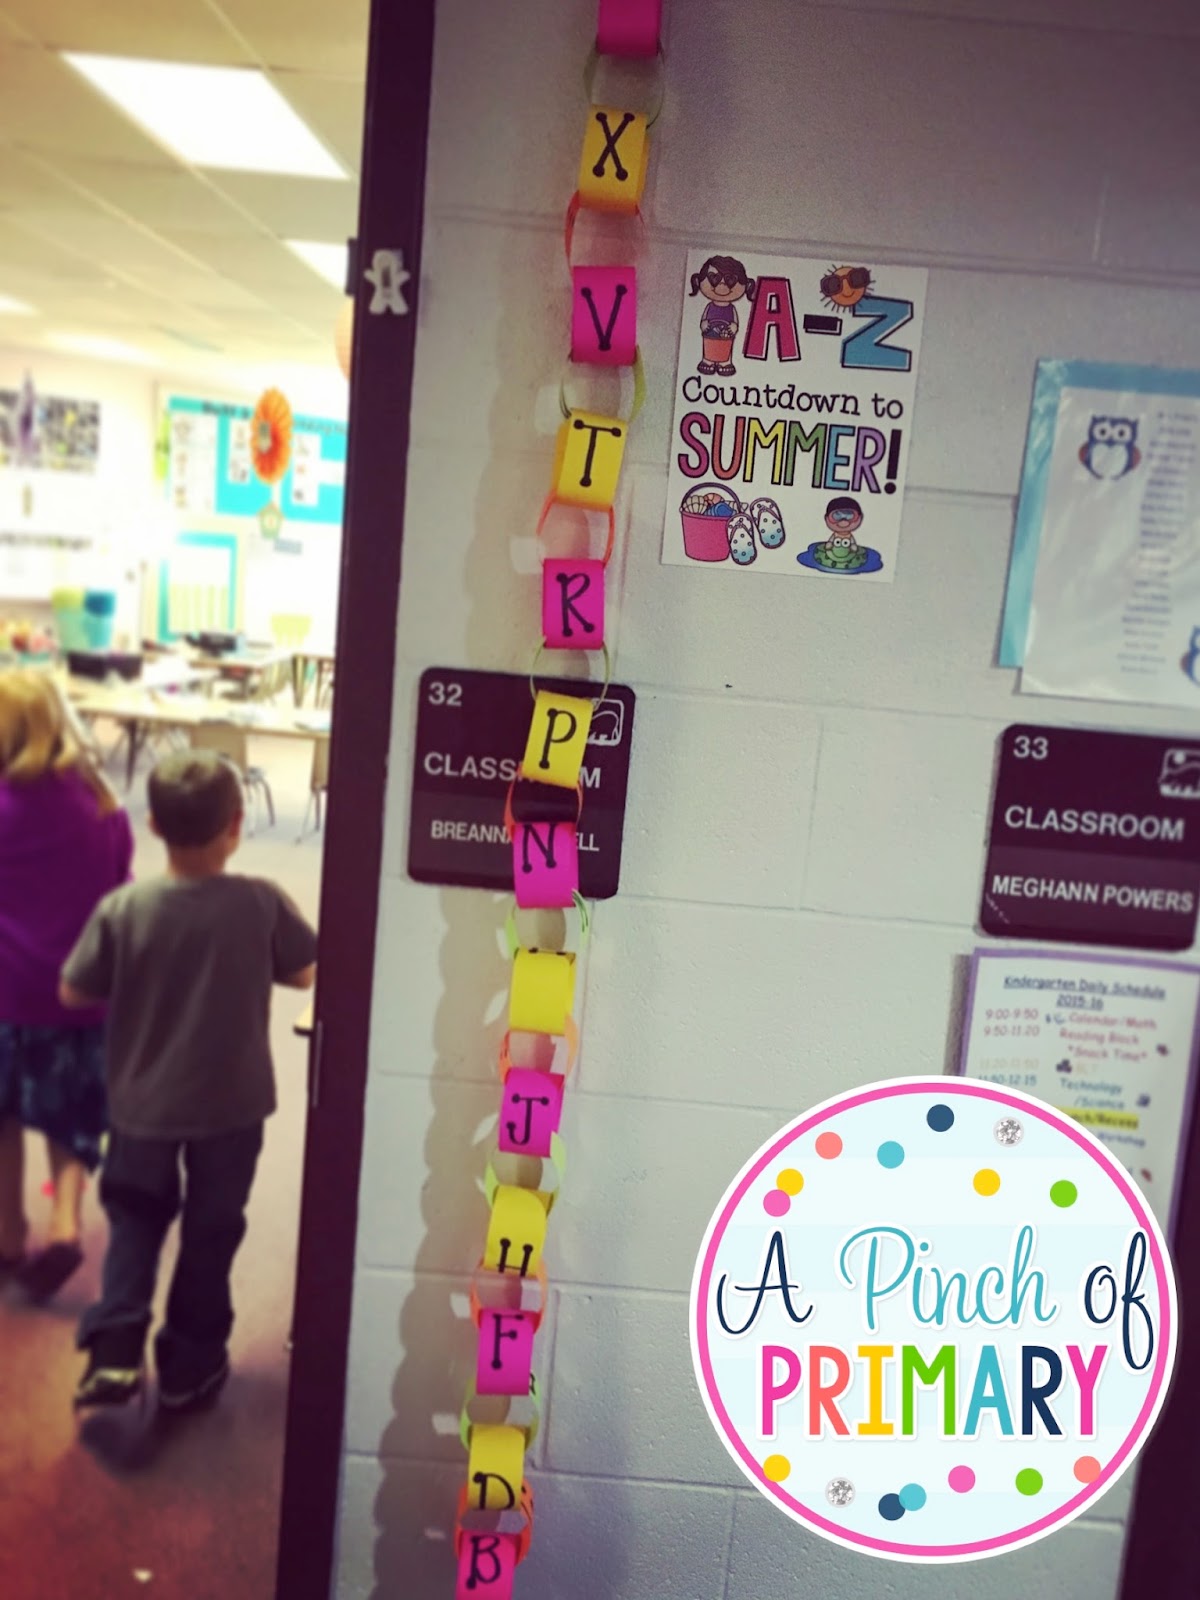
If you have never heard of the A-Z Countdown to Summer, you need to check it out somewhere. Keep reading this post, check out my Instagram (Molly from Miss K's Little Rays is doing Z-A countdown, which is so cool!), check Pinterest...ANYTHING you can to try this awesome and engaging ABC activity to end the year.

To start this, I mapped out a calendar of what I wanted to do and created a paper chain with the letters in reverse order. My calendar is according to dates and just so happens to correlate with a lot of holidays, field trips, and activities at our school this year. The chain serves as a great visual for how many letters/days we have left. Some of the days are what some would call 'standards-based'...others are simply letting them have fun and play. They're 5 and 6 and it is just what they need at this time of year. :)


Click HERE to find a 'generic' version of the calendar without the dates and my school-related events!

Click HERE to find my poster that I used next to my paper chain!


Here's a glimpse at some of the fun so far:


I do not send home the calendar with my kids because I like to have them predict what they day will be. It brings up a fabulous discussion/review of letter sounds!! For example, Monday was 'L'. One of my kiddos said elephant, so we had a discussion about the beginning sound/letter for elephant. Another teacher on my team sent the calendar home so parents were able to send items in, plan ahead, etc. I planned for a few days of treats and small gifts, but nothing major and definitely nothing that is breaking the bank. Hello, Dollar Tree and Target Dollar Spot. To make this as easy as possible, I like to prep my entire week on the weekend or on Thursday/Friday when I do all of my lesson planning.

It is a fun way to keep the kids engaged and ready to go each morning. In my experience, it's a quick behavior fix as soon as I say it is time to do the countdown activity.

Do you do an A-Z (Z-A) countdown in your classroom? How's it going? I'm sure you all have amazing end-of-year tips and tricks and I'd love for you to link-up and let me know! :)


What Worked Well Wednesday: Visual Directions


How many times have you given directions and then right after a student asks, "What are we supposed to do?"

I am hear to share with you what works in my room to keep this from happening!


I needed something so we could avoid this happening.  As a result, I created some visual directions that I use for every activity.  This way I avoid the dread "What are we supposed to do?"

While I am giving directions, I put up each picture and then leave them up on the board during the activity.


Now when a student asks what to do I just point to the board.  It eliminates my students asking this question over and over again as well as my frustration from answering the same question multiple times.

If you would like to grab your own FREE visual directions, just click on the picture below.


We would love to hear what is working well in your classroom?  Link up with us below and make sure to use our W.W.W.W. graphic from the top of this post.


What Worked Well Wednesday: Staying Organized

Hello again, teachers!!! I hope you're having a fantastic week!

I'm Emily, from Carnes Corner, and I'm SO GLAD to be popping in again today, for this week's What Worked Well Wednesday link up.  I've definitely missed you!


I've been known to be a bit OCD, and that tends to overflow in to my classroom and the way I "try" to stay organized.  I wanted to share with you how I keep all of my center materials organized.

I have tubs (from Target, similar to these) for each month/or two months that hold all of the center materials for that time frame. (Of course, they're a teeny bit of an investment, but it's SO worth it!)


 Within each tub, I have the center materials divided by week...in a big ziploc baggie if they'll fit.  So, for example, in my November tub I've got three big ziploc bags with all of the smaller things inside for each of the weekly themes: Community Helpers, Scarecrows, and Thanksgiving.  December is a bit of a different month for me, since it's basically one big theme.  (Plus, I've got some of the center materials for this week already out).  Here's a peek inside December...


As I mentioned previously, when it's time for that center, I just pull out that baggie, make the necessary copies that I need to, and stick the individual centers in my FABULOUS rainbow tubs.  

We call these our "center tubs" in the classroom.  The first four (red and orange) are my literacy centers, and the next four (green and blue) are my math centers.  All of the materials they'll need for that particular center is in the coordinating tub, so the group can just grab and go.


This makes it easy, because I can just say "group one, grab the circle tub and take it to the carpet."

The bottom two drawers (purple) are my Word Work and Work on Writing material tubs for Daily 5 rotations.  


I've found its easier to take my Daily Five materials/centers and keep them in a storage bin all on its own because not all of my Daily Five items follow along with our weekly themes.

So, how do you organize your centers? Have I given you any ideas?? I'd love to hear!!

Oh, and make sure to link up below with what's working well in your room. :)

What Worked Well Wednesday: Successful Parent Teacher Conferences


 Oh, parent teacher conference time! Just thinking about them has always made me feel like...


Some are parents you've never met before. Some you've interacted with for years. Some will be incredibly protective and have their defenses up. You will have to have some difficult conversations about the most important people in their world. This is scary for all involved.

But over the last year or so, I've found ways to make conferences run smoothly and successfully for all involved. Today is our fall conference day, and I am using some of the things that have made conferences successful for me in the past.

Just like we spend time setting up our room for seamless learning for our students, put in a little time to set up for your parents.

The environment sets the stage, so make sure it is pleasant. I put on some soft classical music and ensure that the room is tidy and smells good. These little things can make a big impression. I swear by fragrance plug-ins. These Air Wick plug-ins are inexpensive and permeate throughput the room (a huge room I might add). When you walk in and notice that it smells great, you are already at ease.

I always set up a table and chairs outside my room for those who are waiting for the previous conference to end. On the table, I put some of our class books for students to read to their parents, and give them  a sense of what their kids can do. Our class books about our field trips (which include pictures and students writing about their experiences) are always a big hit.


When you walk in, I have a sign in table. I use picture frames from the Dollar Tree for the signs- it looks nicer and keeps the signs in good condition so they can be used again.


At each child's spot, I have a pile of all of their papers that I will go over with parents. It is easy for me to grab when they get there, and helps me make sure that everyone has a copy of everything. There are always a few parents who can't make it, and now I have everything ready for when I can meet with them. There are always several notes to go home, as well as student journals and portfolios. Our district kindergarten "report cards" are very basic, so I supplement with parent reports from ESGI and a talking points sheet.

I love this format because it reminds me of all the positives. When I sit down to fill them out, I think about what I've seen each child improve in, what they are really strong in, and what they struggle with. I leave the "goals" section blank and fill this out with parents. I love hearing what they want to see for their child, and what they are willing to put into this.  This helps solidify that we are a team, and helps us focus on what we want for that child.These talking points help me stay focused  as we confer. 

 Before leaving, I have a little treat for the families who came. Who doesn't love a little something sweet?


Doing these things has allowed me to make conferences seamless and productive. Going into it today, I feel at ease and well-prepared, excited to see parents beam when I tell them the great things their kid can do. Do you have any "must-do's" for conferences? I'd love to hear about them!


What's going well in your classroom? Link up and share with us!

An InLinkz Link-up

What Worked Well Wednesday Is All About Rekenreks & Common Core Math!

Rekenreks Big and Small:

Since I retired last summer, I decided to write about something that worked in my classroom last October. I made this giant classroom Rekenrek and my students made their own seasonal ones.
Rekenreks are so cool. Students can instantly recognize any number of beads from 1-10 because they have five red and five white beads so they quickly learn that all of the red beads plus one white equals six.
Scroll down to see how to make your own classroom Rekenreks...
Using our big classroom Rekenrek along with our small seasonal Rekenreks.

I just love Rekenreks.  I learned about them just over two years ago and I have included them in my presentations at conferences for about that long.  They just make math real and the small ones are perfect for Number Talks.

My students LOVED using their Rekenreks with ten frame cards, numeral cards, and number word cards. They just looked at the card and showed the same value on the Rekenrek. This worked great with partners.

Rekenreks Big:

Here is my giant classroom size Rekenrek: (and that's Seba, the cat.)
I think my cat was subitizing.  :o)

(Scroll down to see how to make one for your classroom for under $10.)

Rekenreks Small:

I liked making seasonal Rekenreks with my TK class. Last fall, we made pumpkin Rekenreks with only one row of ten beads; five red and five white.  

Fun Foam pumpkins, pipe cleaners, 5 red pony beads & 5 white pony beads.
I drew 2 tiny dots where the pipe cleaners should pierce the Fun Foam.

We made our first Rekenreks with only one bar of ten beads.
Later, we will add a second bar for the numbers 11-20.


Getting to make their own Rekenrek was FUN and they took better care of them because they made them.
They wrote their name on the back with a felt tip marker.

We added an additional row of ten beads when we made our winter Rekenreks.

So, What Is A Rekenrek?

It's a number rack that was designed by Adrien Treffers, a mathematics curriculum researcher at the Freudenthal Institute in Holland.  By building each row of your Rekenrek with five white beads and five red beads, students can instantly subitize (or instantly recognize the value) the number of beads you slide from the right side to the left side.  

Once students realize that there are five red beads and five white beads, it's easy to quickly slide any number of beads from the right side to the left side without counting.  

They use the 5 red beads as an anchor and they can quickly find six by sliding one white bead, along with the red ones, over to the left side.  It's just as easy to locate the 2nd white bead to slide with the red beads to show seven.

You can download, for FREE, a great booklet filled with ideas for using Rekenreks from the Math Learning Center web site.  CLICK HERE for the direct link.

You should also check out the Math Learning Center's web site by CLICKING HERE.
They have tons of ideas under the <resources> tab.

How To Make A Classroom Rekenrek:


It cost me about $9 for everything and it takes about 30 minutes to make one; 15 minutes if you have help.  

Step 1:  Buy materials

2 pool noodles (The 99 Cent Store still has these.  They are up at the very front of the store.)
2 10-foot lengths of 1/2" PVC pipe  (You need just over 13 feet to make the one above.)
2 elbow joints (for 1/2" pipe)
4 T joints (for 1/2" pipe)
4 end caps (for 1/2" pipe)
A can of solvent (like Goof Off) to remove the lettering on the pipes
Paper towels for removing the lettering

My receipt from Lowe's 

You will also need a bread knife for cutting the pool noodles and a PVC pipe cutter or saw.

Step 2:  Cut the PVC

You will need 2 pieces for the sides that are 36", 2 pieces for the bars that are 30", and 2 pieces for the feet that are 20".  Cut the 20" pieces in half to 10" each.  Cut the 36" piece into 2 pieces:  1 should be 26" and the other should be 10".

My husband cut the PVC while I cut the pool noodles.
By working together, we were able to complete this project in half the time, just 15 minutes.


Step 3:  Cut the pool noodles

Mark the pool noodles to measure 1 1/4" pieces.  You will need 5 of one color and 5 of the other color.  
Using a serrated bread knife, try to make straight cuts.  You can trim them down with scissors if needed.

A serrated bread knife works best for cutting pool noodles.
Use the extra noodles to share with a colleague or check out Pinterest for all the
amazing things you can do with pool noodles in the classroom.


Step 4:  Assemble your Rekenrek


Slide the pool noodles onto the bars and attach the sides and bars to the joints.
You can add glue to the inside of the joints to make it more durable. 

One elbow joint and one T joint.

From left to right: Elbow joint, 10" of PVC, T-joint, 26" of PVC, T-joint, 10" of PVC, cap.
The next part will be the other 10" piece of PVC for the 2nd half of the stand and a cap.


The feet.  Each side is 10 inches.

One complete side.
The top half is 10" tall.  The bottom is 26" tall.


You can see the writing on the pipes.  Next step is to remove that.

Step 5:  Clean the pipes

Clean the writing off with a solvent like Goof Off.  Spray it on a paper towel (outside) and rub it on the lettering until it is all gone.  Rinse the solvent off of the pipes before bringing it to school.


That's all there is to it !!!


And there's an app for that:


Click the image to view the app.
Perfect for iPads or iPad minis.  Also works on iPods and iPhones.


  Or you can buy them here:

Click the image to see the product's site.


Looking for more FALL MATH ideas?
Check out the bloggers who link up below: