Image Map

File Organization to Maximize Planning Time!


Hello teacher friends!  It's Cori from Mrs. B's Beehive with a quick organizational tip for some Winter file clean-up!


If you are anything like me, you have a million resources all over the place.  Resources that belong to your school or district curriculum, resources that you've purchased from TPT over the years, and things that have inherited from other teachers.  Every class is different, and I definitely don't use the same resources every year, so I have quite a collection of resources at my fingertips.

To begin with, I make a curriculum plan for the whole year usually during my summer break.  I try to match-up my different resources, and focus on the same things each week, such as penguins, pumpkins, reindeer, etc. I use this resource to help me see the big picture.


Curriculum Planning Calendar 2016-2017 School Year

I check my school calendar, and give each week a number.


I transfer the week numbers over to my planning calendar, and I start to organize my files. I label each file with a week number.


I put in all of the resources that I think I will need for the week, including homework and art projects.  I really do use a lot of TPT materials, and over the years I have prepped and laminated so many resources!


I used to keep every resource in a separate binder, and pull out things as I needed them, but storing all of my materials by week has really helped me be efficient in my lesson planning and copy making.


Every Wednesday, I pull out the file for the next week, and fill out my lesson plans on Planbook.com.
If you haven't checked out Planbook before, you really should! It takes a little bit of effort to set-up, and the first year is a little more labor intensive, but it really keeps me organized! I love how easily you can designate standards for each lesson, and get a tally of how many times you have taught each standard in a year.

My copies are already in the folder ready to go.  From year to year, there are some things that I keep, and some things that I change, but this system has saved me an incredible amount of time.  I hit print on my lesson plans, and head off to the copy room!  Honestly, after having this system in place for about 9 years, it takes me a maximum of 30 minutes to complete my lesson plans, and get my copies ready for the upcoming week!

I know this is a super simple technique, and I hope all of you are already using it!  Hopefully it will help some of you out there cut down on your planning time, so that you can focus on one of the other million things on your to do list! : )

Happy New Year..Let's get ORGANIZED!

Happy New Year from everyone at Kinder Tribe! We are so excited for 2017! 

I'm Breanna from A Pinch of Primary and this month the Kinder Tribe members are going to be discussing all things ORGANIZATION. 


Organization can mean a number of things for you, your teaching BFF next door/across the hall, or the loud voiced teacher that needs to close her door because she gets so into her read-alouds (maybe that's just me?? LOL). To me organization is something huge and/or something tiny. Whether you're cleaning off a few papers on your reading group table from September (hey, no judgement) or completely revamping your classroom library so it makes sense for you and your kids...IT WORKS and you can make it happen.

Now, I'm still on Christmas Break for another week few days (where did the time go?! #Denial) and I cannot deny that thinking about school has been the last thing on my mind. I haven't touched my school bag and I probably have the start of some dust bunnies on my beautiful Erin Condren planner, but that's what break is for, right? I scroll through Instagram and I see so many teachers working on so many amazing things to get themselves ready to go for the second half of the year, which gets my wheels turning. Yes, they might only be turning between shopping trips and SVU episodes, but they're still turning.

A very simple organization tip that I do at the end of Christmas Break is get the new school supplies out of my tubs and ready for the kids to come back to. They do not get all new supplies, but they will get new crayons, glue sticks, and pencils/erasers. I KNOW I am not the only one whose kids end up with roughly 11 half-broken (possibly half-eaten) crayons by Christmas. I mean, half of my kids haven't seen their black crayon since about Halloween...possibly before then. During Back to School time, I purchased these crayon boxes at Walmart for $1.00 per box (link is not through Walmart).

These have been LIFE SAVING! They fit 24 crayons perfectly and they fit so well in my supply caddies for my table groups. I use the standard supply caddies from Really Good Stuff.


To make my life (and their life) a little easier, I realized the 2"x4" shipping labels fit PERFECTLY on the boxes. 
Add some clipart and a few cute fonts and VOILA, they're ready to go. There's nothing quite like the smell and look of fresh out of the box Crayola Crayons. 


The lovely ladies at Kinder Tribe are going to have some amazing ideas for you and I can't wait to see what's up their sleeves. (Mostly so I can get it together this month!) #StillRecoveringFromChristmasBreak

Have an amazing New Year!

Back to School Organization

It's that time of year.....we are all excited and getting ready for Back to School.

One of the first things I always do in my classroom is work on fine tuning my organization.  I do this before bulletin boards, before setting up my tables, and before I set up my desk.


One of my favorite organizations tips is setting up a place to keep all your materials for the week.


I bought these 3 drawer units and added labels to them for each day of the week.  I also added a label for "next week" as well.  As I make my copies for the week or pull activities and books, I just put them in the correct drawer.

This makes my life so much easier during the week.  It also makes planning for a sub (or emergency sub plans) so much easier.  I can just pull everything out of the drawer and voila, the sub has all he/she needs.


I have one extra set of drawers for work that needs to be checked, stuff to copy, and items that need to be filed.

Do you think you could use these in your classroom?  Just click {here} for a free download of the labels.  There is even a couple blanks ones that you can write your label on.

I hope your back to school time goes smoothly and you have the best year yet!

What Worked Well Wednesday Linky- Staying Organized This Summer

Hello, teacher friends. It's Kelly from My Fabulous Class. I hope you all are enjoying your summer or will be very soon. Today, I am talking about staying organized with your materials in the summer. Actually, this home organizational system can really help you store your teaching printables all year long.

I am  a pinning addict. Seriously. It's out of control. The problem is, I pin amazing winter ideas in May then forget about them by January. I also like to add products to my TPT Wishlist and then I forget about them.


I like the idea of printing things when I find them, but if I print a winter theme activity in June, I end up with piles like this all over my house. It drives my husband crazy. Plus, the papers can get ruined if I don't laminate right away. In the summer, this becomes a HUGE problem because I do print like crazy, but I can't take it into my classroom right away.


I decided to solve this problem with a file carrying case, hanging file folders, and ziplock bags. I bought all of this at Wal-mart but I am sure Amazon has better deals. I labeled the file folders for the months Aug-May, sight words, word work, and math. I have some additional folders that I can add labels to, as needed.


I found this cute beginning sounds center FREE on TPT. I laminated it, cut it, and bagged it. It is ready to go in August. If my August folder gets to full, I might move this to my beginning sounds folder.


I found these FREE Ten Frames for Counting the Days in School LAST YEAR. I was just going through my Back to School Board and found them. They are now printed an in my August folder.


I found this amazing activity HERE on Pinterest. I haven't had time to laminate it, so I just placed it in the January folder. If you are wondering how I can afford to print so much color, I have two words for you - HP Instaink. BEST INVESTMENT EVER.


When you close it up, you have a simple carrying case that you take to school when you need to. It does not take up much space at home and keeps you organized.

What has worked well for you lately? Be sure to link up below. Looking for great ideas that have worked well for other teachers? Read these great posts.

10 Tips for Packing Up Your Classroom

Hello friends.  Heather from Learning with Mrs. Langley here. Summer is upon us!  Before you can kick back, refuel, and relax it's important to get your classroom packed up and organized so you aren't stressed about it this summer!  Here are 10 tips that help me get a fresh start to summer!  

1. Do what you can ahead of time! 

You can't put EVERYTHING away or your kiddos will go CRAZY!  Believe me I have tried it. Kindergarten students need order even in those last days.  Do your behind the scenes packing first. Clean out your desk drawers, organize your closet (or cabinets, or whatever you have for storage!) and get things in order so when you start putting things away you know where you put them. 

Do you have a checklist you need to complete before the last day to officially "check out"?  We have to fill out an inventory sheet, make a list of repairs that need to be done, and record our technology numbers as part of our check out system. This can all be done before the last day.  Save yourself some time on that last day and do it ahead of time.

2. Take Pictures

Do you have an area of the room that you LOVE that you have to pack up and you want to remember EXACTLY how you had it? Take a picture!

3. Purge!  

This one is hard for me.  I don't get rid of much!  The end of the year is a great time to take stock of what you really will use.  Have a box of 65 pine cones?  If you didn't use them this year you probably won't next year.  Although I had a box of 65 pine cones my mom brought me from Cali and I actually did find a use for them....so scratch that, keep the pinecones! But get rid of all the other stuff you didn't use this year. If you have a friend in another grade level that can use it put it in their trusting hands.
Our campus PURGE pile.  Yes....I took a few things!

4. DON'T put away important tools! 

Keep a box that you will need when you start putting things back up.  I keep my stapler in there, scissors, tape, and all of my wall hanging accessories.  I use A LOT of those 3M plastic hooks so I keep them all in this little box with extra stickies to put them back up. 

5. Clean

I cleaned up the items that needed it as I packed up my book shelves.  Those lovely crate seats?  They get SUPER dirty throughout the year.  I wiped down all of my wobble stools too so they will be ready to just put out when I unpack.  Wipe out all of your bookshelves too.  It will save you time when it's time to head back. 

6. Get your kiddos involved

Wiping out book shelves, organizing book boxes, and recycling papers are great ways to get your students involved in the packing up process.  The last week of school I have students check out a book box during our reading time and their job is to enjoy the books, make sure they all belong in the book box, and then return the books that don't belong to the "lost" pile.  After a couple of days of this my library is back to first day of school order! 

7. Want a clean slate?  Take it ALL down!

I know this sounds crazy and I may regret this in August but I took EVERYTHING down this year.  I even removed my mammoth desk so I could have a clean slate after the custodians get done cleaning. I'm playing with the idea of moving a few things around so now if I need to I can start fresh.
Even my alphabet is down.  I can't wait to start redecorating.....later!

8. Cover your bookshelves

Whatever is left in your room cover with sheets.  We are required to do this so I keep a supply of old sheets in my room to cover stuff up.  It's way easier than butcher block paper and better for the environment.  Even better?  Old fitted sheets work great!
Now my dusting will pay off! Clean math bins when I get back in August. 


9. Don't take anything home! 

Seriously....unless you REALLY need it don't take it home.  Piles and piles will not help you relax and recharge this summer.  Of course there are a lot of things we do NEED but don't overdo it.  I'm a horrible example of this.  I have this huge bag sitting on my dining room floor that I'm ready to chuck because I can't even remember why I brought this all home! 
And why is there a cookie sheet in there? 

10. Walk. Away.....

Do it.  You worked hard all year.  As a fellow kindergarten teacher I know this is one of the toughest jobs out there.  We need to leave it all behind (if only for a couple of weeks) and rest.  Recharge. Reconnect.  Do what you need to do to get yourself ready for that next group.  We know that August/September will take ever bit of our energy so save it up now!  Leave it all behind and enjoy your break.  You earned it! 
Walk away....you can do it!

Those are my tips friends! I hope you are enjoying the last days/weeks/months? of the year with your precious kindergarten friends.  It was REALLY hard to say goodbye to my group this year. They just make it so hard to say good-bye! Thanks for stopping by today and as always, happy teaching.


Reading Group Organization

Who doesn't love to be more organized?  Even when I think I am organized I know there is always room for improvement.  I would love to share with you how I organize everything for my reading groups.  It makes my life so much easier during our guided reading time.


I use one of the ten drawer carts that you can find at teacher stores, Michaels, or even Sam's Club.  On each drawer I put a picture of an animal.  All of my reading groups are animal names.


Inside each drawer I have everything that I need for that group.  You will find in each drawer, the lesson plan for that group for the week, the book they are working on, magnetic letters (for our focus sight word), sentence strips, envelopes, pencils, and scrap paper.  You can also sometimes find a Words Their Way sort or Elkonin boxes depending on that group's activities for the week.


When it is time for that group's lesson, all I have to do is pull out the drawer and bring it over to my guided reading table.


I love organizing the group materials this way for a few reasons:

1.  It is easier when I have a sub.  I just tell the substitute teacher to pull out the drawer and everything is there for her.

2.  I have two reading aides who come in to help with reading groups so all they have to do is grab the drawer and go sit with their group.  Easy peasy!

3.  It makes my life simpler.  

When I go to plan for the next week, I take out all the drawers and only put them back in when their drawer is ready to go!

How do you organize your materials for your reading groups?  I would love for you to tell us in the comments.  


What Worked Well Wednesday: Staying Organized

Hello again, teachers!!! I hope you're having a fantastic week!

I'm Emily, from Carnes Corner, and I'm SO GLAD to be popping in again today, for this week's What Worked Well Wednesday link up.  I've definitely missed you!


I've been known to be a bit OCD, and that tends to overflow in to my classroom and the way I "try" to stay organized.  I wanted to share with you how I keep all of my center materials organized.

I have tubs (from Target, similar to these) for each month/or two months that hold all of the center materials for that time frame. (Of course, they're a teeny bit of an investment, but it's SO worth it!)


 Within each tub, I have the center materials divided by week...in a big ziploc baggie if they'll fit.  So, for example, in my November tub I've got three big ziploc bags with all of the smaller things inside for each of the weekly themes: Community Helpers, Scarecrows, and Thanksgiving.  December is a bit of a different month for me, since it's basically one big theme.  (Plus, I've got some of the center materials for this week already out).  Here's a peek inside December...


As I mentioned previously, when it's time for that center, I just pull out that baggie, make the necessary copies that I need to, and stick the individual centers in my FABULOUS rainbow tubs.  

We call these our "center tubs" in the classroom.  The first four (red and orange) are my literacy centers, and the next four (green and blue) are my math centers.  All of the materials they'll need for that particular center is in the coordinating tub, so the group can just grab and go.


This makes it easy, because I can just say "group one, grab the circle tub and take it to the carpet."

The bottom two drawers (purple) are my Word Work and Work on Writing material tubs for Daily 5 rotations.  


I've found its easier to take my Daily Five materials/centers and keep them in a storage bin all on its own because not all of my Daily Five items follow along with our weekly themes.

So, how do you organize your centers? Have I given you any ideas?? I'd love to hear!!

Oh, and make sure to link up below with what's working well in your room. :)

Literacy Centers and Organization

Hi Everyone!

I am Meghan from Meghan's Pad.  I wanted to give you all a sneak peek at what I am doing during my literacy center/guided reading time this year, and how I have it all organized.

This week {tomorrow} I will have a new class of Kinders that will begin their year with me.  Each year, I feel the need to revamp an area of my curriculum.  This year, it's my center time!  


Centers are a great way, as we all know, to engage students in learning by providing them with hands on learning materials and the opportunity to regulate their learning needs.

This year, I am jumping back on the center wagon, and I couldn't be more excited!  The past few years I have struggled with having to use the district mandated curriculum, knowing that Kinders need more hands on, play based learning.  I have struggled with the early finishers, the no matter what I give you to do, you are going to refuse to do it, and the different learning styles and needs.

After much reflection, I have come up with a format that I think I am going to like, and a format that I hope my kinders will like as well.  Here it goes...


Each day I will gather the children on the rug for a small mini-lesson.  These mini-lessons are going to be based on the needs of Kinders.  These lessons can include alphabet, sounds, building words, rhyming, segmenting, strategies, digraphs, consonant blends, vowel blends, and the list goes on.  I will then have a "have to" activity that the children will need to do each day.  During the literacy block it can be an alphabet center, letter writing center, building word center, reading center, phonemic center.  Each day their have to center will switch, so by the end of the week each child has completed all the have tos.  

After the "have to" center is complete they will either turn it in, or will fill out a small exit slip, so I can quickly review their understanding, along with hold them accountable for doing the center.  Then the children will choose a "can do" center.  These centers will be a combination of old "have tos" and other centers that help to support that centers "have to."

Have I lost you??  I know it's confusing!  Here is an example:  A student on Monday will go to the alphabet center and complete the "have to" center.  Once they are done, they fill out and turn in their exit slip.  They then go to the alphabet "can do" drawer and grab a center, take it back to their seat {not assigned, just where they were working} and complete that center.  Once they have completed all the "can dos" that they want, then they can go to the alphabet "now what" drawer to work on those activities.

The "now whats" are going to be more independent activities that can include "worksheets," or reading.

My hope is that children will continue to be engaged, and will find the learning method that they prefer.


So now, the storage!  I love to organize, and love to buy bins.go inside of bins.  So these are PERFECT!  
         

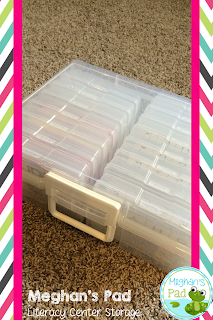
I love to find bins that I found these bins at Joann Fabrics, and have been in love with them.  Each center fits perfectly inside these 4X6 photo cases {materials and all}!  


I am currently putting each center into a small container, and then each container into a drawer system.  This picture was taken before I labeled the drawers.  I have the "can do" centers in one of the drawers and the "now whats" in the drawer directly under.  Each is labeled with the center {alphabet, letter writing, word building, etc.}, and a number {either 2 or 3 for "can do" and "now what"}.


I am currently working on setting up something similar for math and our phonics time.

I would love to know how you do centers in your room?  What do the children do when you are in a small group?  I can't wait to hear all the great ideas!!