Image Map

Teaching Back to School Procedures and a FREEBIE!

Hi Everyone!

   It's Cori from Mrs. B's Beehive!  Today I wanted to talk to you about teaching procedures at the beginning of the school year.


We all know how important it is to set the tone, and clearly communicate our expectations at the beginning of the year.  At the end of the year, your class will be running like a well oiled machine.

By May, I've got all my little teacher helpers organizing things for me just the way that I like them.  I often forget, (probably on purpose) just how much time it takes to get them to that point!  There are so many little pieces of information that I need my students to understand to make sure that the day is focused on learning, and that I am not spending my time running around behind them cleaning and correcting.

I wanted to share with you what my first week's schedule looks like:


Like most other teachers, I read a lot of back to school books. I do a lot of activities around those books and start my preliminary assessments.  In between all of those activities, is the teaching of procedure after procedure.  In the first week I try to prioritize my most important procedures, and go over the ones that will be most effective in establishing a smooth running classroom. (Don't touch the fire alarm!).  Even a simple task such as entering the classroom in the morning, has many different components.


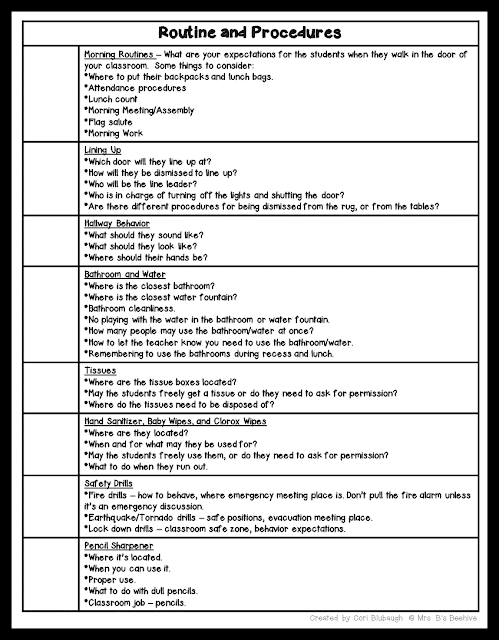
To help myself remember everything that I need to teach them, I made this procedure checklist.  I keep it right next to my first week (and second and third week) lesson plans.  As I teach a procedure, I check it off the list.


There are many times that I find an extra minute here or there in the first couple of weeks, and I quickly scan over my procedures list, and see if there is any information that I can squeeze in to a lesson, to make sure that the students fully understand my expectations.

If you would like a free copy of this Back to School Procedures Checklist, click HERE, or on any of the pictures above.

This list has worked well for me over the last couple of years, and I hope it is something that you will find useful as well as you gear up for back to school!

Feature Friday: Danielle from Carolina Teacher

Happy Friday, Kinder Tribe! It's time for another Feature Friday! Every Friday we will feature a member of the Kinder Tribe who will be sharing their expertise with us!


This week's awesomeness comes from Danielle from Carolina Teacher! She has some really excellent tips for reaching your ELL students! Take it away, Danielle!


Hey Kinder Tribe!  I'm Danielle from Carolina Teacher, and I am so excited to be a guest blogger today for Feature Friday.

Like many of you, I'm sure, I have a large population of Spanish speaking students in my classroom.  Last year, I was a part of an amazing professional development on working with Latino English Language Learners.

So I wanted to share a few strategies with you for how I work with the ELLs in my classroom.  (I will talk mainly about Spanish since that is what I have the most experience with, but many of these strategies work for ELLs with other backgrounds as well.)

Did you know that ELLs will understand English better if they continue to develop their home language, too?  Unfortunately, when children enter school, they often feel like their home language is less valued and they don't like to speak it.  I've heard stories from parents of older children whose kids won't even speak in Spanish to them at home.

A few ways you can honor their home language:

  • Allow them to speak their home language when they are speaking to their friends.  If possible, I like to sit at least two Spanish speakers together, so they have the opportunity to speak Spanish whenever they want or need to.
  • Learn about holidays, foods, and traditions from their culture.  Ask the children and families to share about their experiences.
  • Read books with Spanish words.  Allow your Spanish-speakers to be the experts, and teach new words to the class, as you read.
There are tons of books that include Spanish words.  Here are a few of my favorites...
Dear Primo has two cousins writing back and forth to one another.  One lives in the US in a city, and the other lives in rural Mexico.  It's great for teaching letter writing, compare and contrast, or just a fun read aloud.

Manana Iguana is a twist on the Little Red Hen story.  It's great for a fractured fairy tales unit!

Martina the Beautiful Cockroach is a super sweet folktale from Cuba.  It would also be great to include when teaching fairytales and folktales.  It is also one of my favorite read alouds.  I love the pictures!


This one is a little bit trickier, and can be dependent on the resources at your school.  I know a little Spanish, but not enough to feel confident in speaking with families.  However, there are lots of creative ways you can keep families informed and communication open.

Last year, I started using Google Translate for everything I sent home.  Although nothing is perfect, I checked with a few Spanish-speaking colleagues and they said this was a fairly good translation program.  Every time I wrote a newsletter, permission slip, or invitation, I copied the text and put it through Google Translate.  I always included a disclaimer at the top that said something like: "This was translated by a computer program.  I apologize for any errors."  Then, I copied everything with English on one side and Spanish on the other.  I was amazed at how this small action made a huge impact on family engagement.

I also try to have a Spanish-English interpreter available at class events.  Like I said, this can be difficult if your school does not offer an interpreter, but I wanted to share one strategy I used last year.  I contacted the ESL teacher at the local high school and asked if any Spanish speakers would be willing to volunteer as interpreter at our Open House and Curriculum nights.  This of course would not work for any conversations where you're talking about confidential topics, but can be super helpful at the class or school wide events.

The Frayer Model is a great way to develop vocabulary and language.  It is a graphic organizer that includes a child-friendly definition, a picture, examples and non-examples.

You introduce the word and develop each part of the graphic organizer together as a class.  There are lots of ways to adapt it to make it work best for your class.  Here's one we did last fall.  To help students get started on the concept of examples and non-examples, I had several pictures for them to sort.
You can also have students draw a picture, and then generate examples using their picture.  For Winter, we also did a Frayer model.  For that one, the kids drew and wrote a page to show an example and a separate page for non-example.  I'm so sad I can't find the pictures I took of their finished products!  It was a great way to tell who understood...they drew snow, ice, etc. for the example picture and summer, spring and fall pictures for the non-example.  Then, we made lists for the graphic organizer based on the picture.

I hope this gave you some new ideas for working with the English Language Learners in your classroom!  Thanks for reading.

Daily 5 in Kindergarten- The Basics

Hey everyone!  It's Katie from Miss Kate's Desk.  Today I want to give you a little peek of how I do Daily 5 literacy stations in my classroom.


Let's back up to my first year of teaching.  I had 10 stations.  Yes, you saw that correctly...10!  I was overwhelmed.  I was constantly having to change activities in the different stations, find room for all the stations, and nag nag nag at kids not on task.  I always had at least one or two at my table for a break to calm down and try again.

I felt like Arnold some days after stations.  Key word, felt.  I hope I didn't look like that!


After my first year I just knew I couldn't do that again.  I started doing Daily 5.  It is one of the best decisions I have made the past 3 years of teaching.  The only station I have to change activities in is Word Work, and that usually isn't a whole lot.  The others stay the same all year.  I am also not having to nag at kids and it's pretty stinkin' rare to have a student at my table to take a break and try again.

Now, I do not conference with students during this time.  If you read the Daily 5 book, she talks about conferencing.  I just keep doing my normal small groups.  I conference for writing and this year will start in Math.

Here's the 5 main Daily 5 stations:
Read to Self
Read to Someone
Work on Writing
Word Work
Listening to Reading

Now I'll show you some pictures of those areas the students work and also some that shows some activities or how I organize it.

I let my students choose for each of the 3 or 4 rounds we do (depending on our schedule that day) where they want to go.  Daily 5 is big on choice.

Yes, you read correctly up there...they choose!  I have some posters from Kristen Smith (A Day in First Grade...she's now in kinder!) that are a freebie in her store that I use for students to take a clip and clip it to a sticker on the poster.  That means they are working at that station for that round.  If all the stickers are full of clips, that shows the kids that station is full and to find an open one.  When we switch and do another round, the students go back to the carpet with their clips and I call tables to go find a new station to put their clip at.  They can't visit the same area again if they've already been there that day.  Also, they are reminded every day to think about a station they haven't been to in a day or so and try it.  If I notice someone is never going to a certain station I may call them up to chat and encourage, but that's rare.

You can see to the right the poster (it's cut off some) and the green stickers.  That's where the kids would put their clip with their name to show they are working there.  

Don't let choice scare you! It may make you a little nervous at first, but they are SO MOTIVATED BECAUSE THEY CHOSE THAT STATION.  Before Daily 5 I was constantly stopping my groups to give a bunch of warnings, or call kids up to talk about what they were doing.  Now, it's rare.  Maybe once a week...sometimes less.  

Think about us as adults, if someone tells you to do something and doesn't give you choices...you may do it but not well or to the extent if you decided to do it without being told.  You'd be more excited about what you are doing and put in more effort.  It's the same with five and six year olds.

I store the clips on a poster hung up with magnets on a file cabinet. I just made a background and put Daily 5 and that's where the clips live when not in use.  


Alrighty!  Here's the stations!

Read to Self
 Students find a book and read in this big carpet area.  They can read on the bench, on those red back pillows, or sprawl out on the floor.  We practice the week we learn procedures our reading stamina as a class.  I start a timer and when someone isn't reading or starts talking we start over.  They love doing this and trying to get a higher time.  It helps in the long run with practicing reading the pictures, reading words (if we can this early on), or telling a story (in our heads of course).  The beginning of the year our rounds are about 6-8 mins each and gradually work up to about 15 mins each.  This helps build stamina too!

We always talk at the beginning of the year about getting comfy because readers read in all sorts of places and ways.  I tell them I do in the bathtub but that's dangerous if I drop my book in the water.  :/  They get a kick out of that and I'm sure tell their family that I read in the tub.  

Read to Someone (or Read With a Friend)
Students can grab the cushions under my desk and read anywhere in this large area in the front of the room.  We go over EEKK (elbow to elbow knee to knee) with the book in the middle so both can see.  We model and practice a lot how to do this and share the book in the middle.  Both students pick a book.

Pretty decent EEKK.  This year I'm going to have a tub by the cushions of books that I have that are doubles if they choose.

Listening to Reading

I use LeapReader pens.  I've slowly invested in these the last 4 years as well as the books that go with them.  I have tried CDs before but it's always been a huge problem regardless how many times I teach how to use the cd players.  They are much more focused with these pens and books.  If you've never heard of them, go on Leap Frog's website and check them out.  I use headphones so the kids do not hear the pens reading.

Work on Writing

At one of the tables is the writing station.  Students grab paper of their choosing (changes throughout the year and the variety) off that little writing center by the file cabinet, a pencil, and a container of crayons. I let them choose what they want to write about. 

We had a major Fly Guy obsession last school year. 

Word Work

This is just one little snapshot of the area in the back of my classroom.  Students can sit at this counter and play word games (in those drawers), write word lists (on the Boogie Boards), or not pictured I have 2 large pocket chart stands and also a big whiteboard to play word games on or practice writing words on the whiteboard.  This year I've put up sight words (like usual), but added CVC word lists.  I plan to staple up some more words as well.  This is the only station that I put new things in the drawers, maybe once every few weeks.  

If you're one who has 10 stations like I had, bless you.  :)  Haha!  It just didn't work for me and my kids.  This year will be my 3rd year of doing Daily 5 stations and I love it.  It just always amazes me how quick they catch on to how stations work (after a week), how I can easily do my small groups, and how focused the students are at their station.  

Giving students choice is scary at first but it's amazing.  They work so much harder and enjoy it!

Sorry for the LOONG post.  I could go on and on.  Hope this gave you a little bit of insight into what Daily 5 looks like in K.  Feel free to email or comment if you have questions!  I'll be doing a more in depth look at each of the 5 stations soon on my blog.

-Katie : Miss Kate's Desk


Feature Friday: Allie from The Positive Teacher

Hi Kinder Tribe Friends! It's Friday which means that it is time for another Feature Friday! Every Friday we will be featuring a member of the Kinder Tribe and they will be sharing their expertise with us!
I am so excited to introduce you to Allie from The Positive Teacher! She just moved to the area that I live in and so I am so excited to become real life friends soon! Take it away Allie! 


Hello Kinder Tribe!  I'm Allie and I blog at The Positive Teacher.   I am so excited to be the Feature Friday to share about new beginnings and how to be a connected educator.

As we are preparing for back to school, many of us are changing roles.  Some of us might be in a different district, school, grade level, or position.  This year I am moving from Ohio to North Carolina to teach full day Kindergarten.  I spent the past 2 years teaching in my hometown, but am so excited for a new chapter in my teaching career.

ATTITUDE


Whether you are facing change by choice or not, embrace it.  Sometimes change can lead to something unexpectedly great.  There are many times where things did not work out how I expected, but it turned out to be a fantastic experience.  The most important aspect of any change in your career is to be there for your students.  They need you at your best!  A positive attitude goes a long way.

COLLABORATING

I love collaborating and learning from others.  When teachers work together, it benefits the students.  If you are a new staff member, make the effort to get to know your team and other staff members.  I am looking forward to meeting my team and assistant.  

CONNECTED EDUCATOR 

                                                    
 For educators in any role.  We blog monthly and comment on each other's posts.  Each tribe member has various experiences, which is great when seeking feedback.
    
For North and South Carolina teachers.  Looking forward to meeting more teachers in my geographical area.  It is important to me that I connect with my community.
For Kindergarten Teachers. 

Other ways to connect with educators online:
-Teacher blogs
-Twitter
-Instagram
-Periscope
-Facebook groups

Enjoy your weekend! 

What Worked Well Wednesday 8-4-15


Hello friends!!!!
This is Jill from Chevron and Centers. I am so excited to bring you this week's what worked well Wednesday. I am looking forward to reading all about what worked well in your classrooms past and present. 
I started my 2015-2016 school year on Monday with a fun filled day of PD....notice the sarcasm ha! Tuesday I got to meet my kinders and let me just say they are precious! Our first day with the kiddos will be Thursday.

I am going to share with you all about something that is very near and dear to my heart and it has also worked VERY well in my classroom. I am very passionate about whole brain teaching!! If you haven't heard about whole brain teaching let me tell you that you are totally missing out! I have been using WBT for 5 years. It was a life changer for me:) I am going to share with you today about the classroom rules.
These are the rules displayed in my classroom:) We go over these rules every day and several times throughout the day. Each rule has a gesture as well. My kiddos love the gestures. There are several youtube videos where you can watch different classes reviewing the rules and you can see the gestures.
          
I will use a green sticky note on these rules at certain times throughout the day. There are time when they don't have to raise their hands to talk or to leave their seats. I always tell them at the beginning of the year when I introduce the rules that they don't have to ask me to get a tissue(unless the tissue train gets started) or throw something in the trash. 
I love rule number 5! It is like the catch all rule. I also emphasize that they are not making me happy but keeping me happy. I tell them that I wake up everyday happy to come to school and be with them! They know that by following the classroom rules and expectations they keep me happy. I say this every morning ha. I'll say do you have to make me happy? They will loudly reply with NO WAY you are happy to be here so we will follow the rules and make smart choices to keep our dear teacher happy!
This is the fabulous scoreboard!! This is a GREAT tool to help encourage the whole class to follow the rules. When I introduce each rule we "practice" it and they earn smilies if everyone is participating and frownies if not. The key to the scoreboard is +3 or -3. The class should not have way more smilies than frownies and vice versa.  I offer extra recess or a 2 minute dance party if they have more smilies at the end of the day. This tool is a great way to get total class buy in. Positive peer pressure can be a good thing! I use the scoreboard for lots of things! I'll have to share more about it later:) You can also go to the Whole Brain teaching website and find lots of info on it!!!
I know what you are thinking now. What about that one little friend who is super stubborn and just won't do what I ask? That's where the practice cards come in. I have a small pocket chart with each child's number on it. I also have small copies of each classroom rule. If a child continues to break a rule I will put a copy of that rule in their pocket on the chart. They then have to go to a separate spot in the classroom and practice that rule for 3 minutes. They have to use gestures and words while they practice. There are times that I make them take the practice card outside too. Towards the end of the year I will add a sentence practice as well. 

Thanks so much for stopping by our kinder tribe to check out WWWW!! Please link up below and join in on the fun!!
There are only 2 rules....
1. Make sure that you link up your what worked well post and not your TPT store or products:)
2. Please take time to read through 2 blogs above you and 1 after you and also leave meaningful comments on all 3 blogs.

Organizing Your Alphabet Activities

Hi friends!  It's Amanda from Mrs. Pauley's Kindergarten here with you today.  I have a quick tip for you about organizing your alphabet activities.


Each year I spend two days for each letter at the beginning of the year.  We focus on forming the letter correctly, learning the name and sound, and of course do our Heidisong songs for the letters.  I use many different resources for this time and it was hard to keep them all straight.

I decided to change up how I keep track of all these resources.  Here is my new Alphabet binder:


I bought a white binder and added this cute new binder cover.  (You can grab it here for free!)

Then I went to Staples and bought these tab dividers.


I put all my resources together and separated them by letter.


The best part about this is that later on when I have a student who is struggling with their letters and sounds I can pull out just the resources they need for the letters they are struggling with.

Here is an example of one of the many activities in my binder.  This was a freebie on the blog Over the Big Moon.  Grab this freebie here.


I will have a post on my blog soon about interventions I use for students who do not know their letters and what I do to help them.

I hope you enjoy these freebies and that they are useful to you in your kindergarten classroom.